Here's a picture of the one I bought. It's a Hitachi 2.25 HP combo fixed base / plunge base. It's a mid-range router - not top of the line, but good enough for my needs.

The first day I had the thing I was a bit overwhelmed. Having never used a router before, it took me a while to get used to the various settings. Fortunately, I had a bit of scrap wood to experiment on. The first lesson I learned was it makes a huge difference which direction you move the router. One direction took splintering chunks out of the wood, the other made nice smooth cuts. I later noticed there's an arrow on the base on the router pointing in the direction you should move the router while making cuts.
My initial purpose for getting the router was to make some Japanese-style shoji screens for the windows in my condo. Currently, I have one room set aside as a dojo for practicing karate, however the room is directly across from a neighboring apartment building. Given the large mill windows in my condo, it doesn't leave much for privacy. Sure, I could have bought curtains or blinds, but I thought it might be fun to try to make Japanese screens for the windows. Also, I though those might fit the theme of the room a bit better.
If you don't know what shoji screens are - think of a wooden frame with a wooden pane or lattice, covered with white rice paper. If you've ever been to a Japanese restaurant, or seen a movie set in Japan, you most-likely have seen these screens before.
So, given that I wanted to make a wooden frame, I had to experiment on how I wanted to join the pieces of wood. Here's a piece of wood that I experimented on to get a feel for making different cuts.

I could have just nailed pieces of wood together with their ends abutting to make a frame, but I wanted to do something a bit better. Ideally, I didn't want to use any nails.
Having never done any type of wood joinery before, I decided to research it a bit. A few google searches later and I found what I was looking for. Before reading up on making joints, my initial idea had been to notch the two pieces of wood so they would overlap and remain the same thickness as the original piece. I later learned that there's a name for that - it's called a half lap joint. While a half lap joint would be fairly easy to cut, I learned there are better joints than that for making a frame.
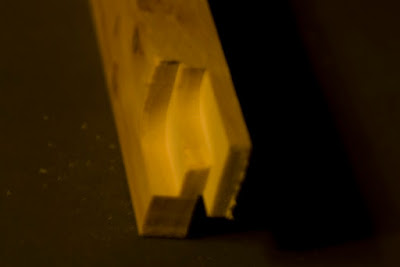
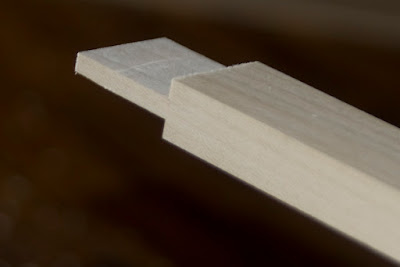
One of the most common joints is a mortise and tenon joint. With this joint, a square hole is cut in one piece of wood, and the other piece of wood has its end shaped to match this square hole. Then, the shaped piece is just inserted into the square hole. There are bunch of variations on the mortise and tenon joint, one of them is called a corner bridle joint. Instead of cutting a square hole for the mortise, the end of the wood is slotted, and the other piece of wood has its ends trimmed so it will fit in this slot. This is the joint I decided to use. Here's a picture of two pieces of wood I cut to form this joint.


As I already mentioned, I've never used a router before, and never made any joints before (hmmm.. I suppose there's a drug joke there...), so it took me a very long time to get to those above two finished pieces of wood ready to be joined.
Along the way, I discovered people often make things called "jigs" for doing various tasks with routers. They might have one jig for making dado cuts, another for cutting tenons, etc. I don't have a workshop - I'm just using the empty dojo room as a temporary carpentry area - so I don't have a workbench. I don't even have a table in the room. Everything is just scattered around on the floor. Most of the jigs I read about involved clamping the jig to a workbench, so they weren't too practical for me. In fact, most projects I read about involving a router mentioned the importance of clamping the wood to a table so the router could more safely be moved across the surface of the wood. This made me realize it would be a lot easier to do this project if I had some sort of table. But as I mentioned, I don't have a workshop, so it would be impractical to buy a regular work bench or wood working table. Once I was done with this project, I'd need to store the table somewhere.
Another alternative to clamping the wood being worked is to have the router built into a table. Then, rather than moving the router across the wood, you feed the wood across the router, similar to how you use a table saw. The router is just attached upside down to the bottom of the table so the bit sticks up through a hole in the table. Again, I don't have room for a full-sized table, but I discovered one company that makes a portable router table. It's fairly compact in size, and when your are done using it, you can just fold it up and stow it somewhere. So, that's the route I took (ug, that's not an intentional pun). Here's a picture of the table:

The table has a removable adjustable fence. It allows a stable surface for sliding wood across the router and the two knobs on the back provide a means for adjusting the distance from the router blade. The fence is made of two pieces, so you can set there distances independently. So far I've only used this for making the left-hand fence into a stopper to prevent me from sliding a piece of wood too far across the router bit. That allows me to ensure I make a cut of a precise length (very useful for making the tenon joints all the same length. Supposedly this dual adjusting fence is also useful for some other routing technique, although I don't yet understand what that is. (The manual says "it allows jointing without the use of shims.")
One thing I discovered when cutting wood with the router is there is a tendency for the edge of the wood to splinter if you are making a cut completely across a piece of wood. To prevent this, it is useful to clamp a piece of scrap wood to the trailing edge of the wood being cut. Here are two pictures of this. This first shows a top-view of a piece I was making into a tenon joint, the second shows the bottom of the piece after it was cut.


After several hours of experimentation with the router table, I finally got the desired joint. Once I verified the technique on some scrap wood, I made one window frame as a test case. The corner bridle joints held together pretty well - I made them tight enough to require a mallet to tap them into place.

Then, once I had a square frame, I drilled a hole in each corner and tapped in a a small wooden dowel to prevent the joints from separating.

Once the main frame was complete, I cut some small strips of wood for the lattice. I notched the main frame to the depth of the wood strip, and made a half lap joint where the strips of wood overlapped so it would all be flush. I then drilled smaller holes in those strips of wood so I could use smaller dowels to hold the lattice in place on the frame.

Then, once all was together, I glued the rice paper to the back of the frame. Given the rice paper is translucent, I matched the shoji lattice so it overlaps with existing pane layout of the mill windows. This way the underlying mill window frame won't throw any extra shadows on the rice paper. Here's the final product. (You can see the matching mill window lattice in the window on the right.)

A friend recommended I use double-sided tape for attaching the paper, but I didn't have any on hand, so I resorted to Elmer's glue. The reason for not using glue is if you don't get the paper in the proper place the first try, you then have to slide it into place, and the glue might then end up being visible. Given the size of the rice paper roll I had, it took two sheets of paper to cover the lattice. The first piece went on ok, but I accidentally dragged the second piece across the glue, so in the upper middle pane you can notice a faint line of glue on the paper.
All-in-all, it was a fun project. I'm pretty happy with how it turned out. I intentionally did not apply any finish to the shoji screen wood. In fact, I didn't even sand the joints. Since this was my first attempt, I knew there would be some visible mistakes in the joints and such. I reasoned that the gaps and such in the wood would be even more noticeable or out-of-place if they were sanded smooth and were side-by-side with joints that looked a lot better. By leaving them all "rough-cut" they all match a bit better. At least, that's what I hope.
It took a long time, and I made plenty of mistakes along the way, but I think the next batch of screens will go a bit smoother based on what I learned. I still have five more windows to cover. Hopefully they won't each take as long as this first one.
One thing I'm wondering is whether the shoji screens might look better with the panes subdivided a bit more. As I already mentioned, I intentionally matched the mill window pane design. I suppose as long as I don't move these initial three cross bars, I could add more cross bars to make smaller panes. My one concern would be that it might look odd that the screens don't match the layout of the mill windows above them. Also, from an outside view the mismatched lattice work would be noticeable at night due to lights from within my condo.


