I leave for Africa later today; specifically, I'm going to Kenya and Tanzania. A few minutes ago I came across a travel warning on the US State Department web site regarding Kenya. Here's a snippet:
The Department continues to recommend that private American citizens in Kenya evaluate their personal security situation in light of continuing terrorist threats and increasing incidents of violent crime. Terrorist acts may include suicide operations, bombings, attacks on civil aviation, and attacks on maritime vessels in or near Kenyan ports. Violent criminal attacks, including armed carjacking, kidnappings, and home invasions/burglary, can occur at any time and in any location, and are becoming increasingly frequent, brazen, vicious, and often fatal. In January 2007, two family members of a U.S. Embassy employee were killed by armed carjackers. Kenyan authorities have limited capacity to deter and investigate such acts.
Hmmm... sounds delightful. Well, not much I can do about this now, other than be a bit careful, I suppose. I guess a question would be whether I'd have still bought my plane ticket had I read this warning earlier. I dunno. Probably not.
Oh well. It'll be an adventure.
Friday, December 28, 2007
Thursday, December 13, 2007
My worst commute ever
Today I had my worst commute home from work ever - or at least the worst I can remember. There was a weather forecast for 6 to 12 inches of snow, due to start around noon and continue until mid-evening. Because of this, just about every school system in the state let the kids go home early, and many businesses (including where I work) let their employees work just half a day. Unfortunately, this led to way more cars on the road in the early afternoon and combined with terrible road conditions, it was a total mess.
Before I knew we were able to leave work early I took a short drive to get some lunch around noon. What was normally a 5 minute drive to get back to work took me about 30 minutes! Then, when I got back to work I learned we could all leave. Having just experienced the terrible traffic jams on all the city roads and looking out the window and seeing the highway a parking lot in both directions, I was in no hurry to leave. I figured I'd wait it out a while until things got a bit better. The only problem was, they were officially closing the office at 3:00, which meant I really couldn't wait it out too long. Then I realized since it was actually snowing, and snow tends to accumulate, the roads probably wouldn't be getting better any time soon. (Ha, I'm really getting my money's worth out of this college education. I can use logic and reasoning...) So, I finally decided to head out at 2:30.
Initially, at least for the first few minutes, the drive wasn't bad. The roads were fairly empty and snow covered, but I have all-wheel drive, so it was easy going. Easy going until I got to the highway on-ramps. I have a choice of going either north or south and either works due to some other highway splits along the way. Usually if I see the highway slow going one way, I'll just take the other ramp. Unfortunately, this time both ramps were completely backed up and didn't appear to be moving at all.
Not being one to enjoy sitting in traffic, especially for what looked to be a several hour ordeal, I decided to try getting home via back roads. I figured the drive to the onramps had been fairly smooth going, maybe everyone was stuck on the highway and the back roads are clear. Well, that turned out to be wrong. That initial strip of clear road was the only bit of clear road I'd see the rest of my drive home. I felt like I was in one of those "end of the world" movies where everyone was on the road running away from something. The only difference was there were traffic jams in every direction. Whatever this end of the world disaster was, there was no clear agreement on where it was coming from or where we should be running to.
So, what normally takes 30 minutes, instead took me over 2 hours. I know my friends living in the Los Angeles area will think this is nothing - they have to deal with stuff like this every day. But for someone who has been spoiled by a fairly easy 30 minute commute, taking over 2 hours to go 20 miles is a bit of a pain.
The one positive of all this is got a lot of experience driving my Rav4 in the snow. I had bought it back in the spring, so I think I only drove it in a small amount of snow once before. The all-wheel-drive seems to handle things fine. I never found myself slipping or sliding when accelerating. In some cases that was a disappointment - it's kind of fun sliding around corners when pulling out of a side street. Now, the car instead starts beeping and cuts the power to the accelerator, activating some sort of anti-skid traction control. Bah! Darn highway safety....
Edit 12/17/07: I recently spoke with a friend from karate class and his commute that same day was the worst I've heard of so far. It took him 7 and a half hours to get home from work!
Tuesday, December 04, 2007
My body is teeming with microorganisms!
I haven't noticed any adverse side effects yet, but my body is teeming with microorganisms right now. Tonight I received five vaccinations - one each for yellow fever, polio, typhoid, hepatitis-A, and the flu. I'll be going to Africa - Kenya and Tanzania more specifically - in a few weeks. In preparation for the trip, I visited a travel clinic at a local hospital to find out what was recommended for preventive medicine.
The clinic was pretty informative, although it took way more time than I expected. I had a 5:00 appointment, but didn't finally get out of the hospital until some time after 7:00. In turns out the clinic consisted of an initial group seminar led by a doctor who explained all the different vaccinations and medicines , their benefits and risks, which ones are needed based on travel destination and so forth. The doctor then asked each of us in the group which of the vaccines and other preventative medicine prescriptions we wanted. I opted for getting pretty much everything that was recommended, including a prescription for anti-malaria pills.
The yellow fever vaccination was kind of scary to read about. I had to sign a waiver for it and the doctor warned me there was a chance I could die from it. Seriously. It's only a small chance, but still, it happens. The vaccination is required for entry into Kenya and Tanzania, so I didn't really have much of a choice. And yellow fever sounds pretty nasty, too, so I was happy to get the vaccination. Fifteen percent of the people who contract yellow fever end up with really awful symptoms within 24 hours - including vomiting blood and other such nastiness. Of those who get these terrible symptoms, half of them die within two weeks! There's no cure for the disease once you contract it, either. Your body has to just fight it off on its own. So, here's hoping the vaccine works as advertised....
The choices for malaria drugs were interesting. I don't remember the exact details anymore, but there were three options - one drug had side effects that included causing bad dreams and depression, another lacked any significant side effects but had to be taken once a day and cost $15 per pill, and a third option was more reasonably priced, but caused sensitivity to sun. I was tempted by the idea of a drug that causes bad dreams, but instead opted for the sun sensitivity. The $15 per pill option (Malarone) had to be taken for a significant number of days after the trip, so the complete dosage would have cost me about $300. Yikes!
As it was, including the costs of the vaccines, this trip to the doctor cost over $350. The good news is most of these vaccines are good for 5 or more years, so it's not like I'll need to get them again any time soon.
I'll be sure to post a followup if I develop any super powers from this combination of vaccines and medicine.
Sunday, November 18, 2007
Making Shoji Screens
Recently, I bought a router. No, no, not one of the electronic network traffic controller things. This is a wood working tool. I've been wanting to get a router for a long time - they can be useful for so many woodworking projects - but having never used one, I was always a bit intimidated by them.
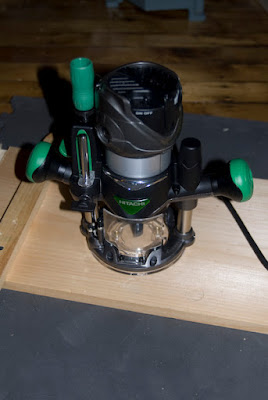
Here's a picture of the one I bought. It's a Hitachi 2.25 HP combo fixed base / plunge base. It's a mid-range router - not top of the line, but good enough for my needs.
The first day I had the thing I was a bit overwhelmed. Having never used a router before, it took me a while to get used to the various settings. Fortunately, I had a bit of scrap wood to experiment on. The first lesson I learned was it makes a huge difference which direction you move the router. One direction took splintering chunks out of the wood, the other made nice smooth cuts. I later noticed there's an arrow on the base on the router pointing in the direction you should move the router while making cuts.
My initial purpose for getting the router was to make some Japanese-style shoji screens for the windows in my condo. Currently, I have one room set aside as a dojo for practicing karate, however the room is directly across from a neighboring apartment building. Given the large mill windows in my condo, it doesn't leave much for privacy. Sure, I could have bought curtains or blinds, but I thought it might be fun to try to make Japanese screens for the windows. Also, I though those might fit the theme of the room a bit better.
If you don't know what shoji screens are - think of a wooden frame with a wooden pane or lattice, covered with white rice paper. If you've ever been to a Japanese restaurant, or seen a movie set in Japan, you most-likely have seen these screens before.
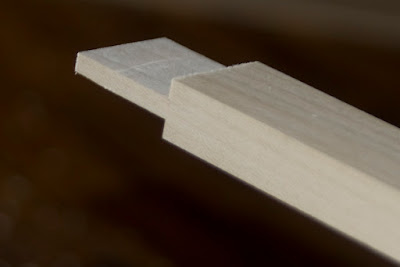
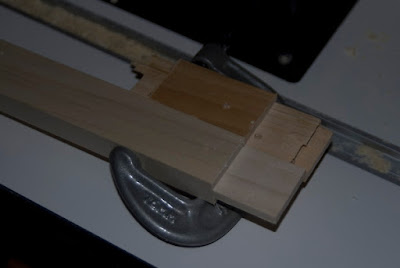
So, given that I wanted to make a wooden frame, I had to experiment on how I wanted to join the pieces of wood. Here's a piece of wood that I experimented on to get a feel for making different cuts.
I could have just nailed pieces of wood together with their ends abutting to make a frame, but I wanted to do something a bit better. Ideally, I didn't want to use any nails.
Having never done any type of wood joinery before, I decided to research it a bit. A few google searches later and I found what I was looking for. Before reading up on making joints, my initial idea had been to notch the two pieces of wood so they would overlap and remain the same thickness as the original piece. I later learned that there's a name for that - it's called a half lap joint. While a half lap joint would be fairly easy to cut, I learned there are better joints than that for making a frame.
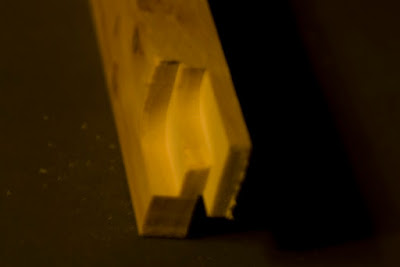
One of the most common joints is a mortise and tenon joint. With this joint, a square hole is cut in one piece of wood, and the other piece of wood has its end shaped to match this square hole. Then, the shaped piece is just inserted into the square hole. There are bunch of variations on the mortise and tenon joint, one of them is called a corner bridle joint. Instead of cutting a square hole for the mortise, the end of the wood is slotted, and the other piece of wood has its ends trimmed so it will fit in this slot. This is the joint I decided to use. Here's a picture of two pieces of wood I cut to form this joint.

As I already mentioned, I've never used a router before, and never made any joints before (hmmm.. I suppose there's a drug joke there...), so it took me a very long time to get to those above two finished pieces of wood ready to be joined.
Along the way, I discovered people often make things called "jigs" for doing various tasks with routers. They might have one jig for making dado cuts, another for cutting tenons, etc. I don't have a workshop - I'm just using the empty dojo room as a temporary carpentry area - so I don't have a workbench. I don't even have a table in the room. Everything is just scattered around on the floor. Most of the jigs I read about involved clamping the jig to a workbench, so they weren't too practical for me. In fact, most projects I read about involving a router mentioned the importance of clamping the wood to a table so the router could more safely be moved across the surface of the wood. This made me realize it would be a lot easier to do this project if I had some sort of table. But as I mentioned, I don't have a workshop, so it would be impractical to buy a regular work bench or wood working table. Once I was done with this project, I'd need to store the table somewhere.
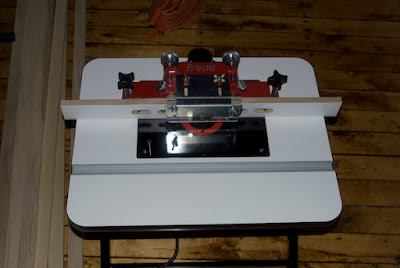
Another alternative to clamping the wood being worked is to have the router built into a table. Then, rather than moving the router across the wood, you feed the wood across the router, similar to how you use a table saw. The router is just attached upside down to the bottom of the table so the bit sticks up through a hole in the table. Again, I don't have room for a full-sized table, but I discovered one company that makes a portable router table. It's fairly compact in size, and when your are done using it, you can just fold it up and stow it somewhere. So, that's the route I took (ug, that's not an intentional pun). Here's a picture of the table:
The table has a removable adjustable fence. It allows a stable surface for sliding wood across the router and the two knobs on the back provide a means for adjusting the distance from the router blade. The fence is made of two pieces, so you can set there distances independently. So far I've only used this for making the left-hand fence into a stopper to prevent me from sliding a piece of wood too far across the router bit. That allows me to ensure I make a cut of a precise length (very useful for making the tenon joints all the same length. Supposedly this dual adjusting fence is also useful for some other routing technique, although I don't yet understand what that is. (The manual says "it allows jointing without the use of shims.")
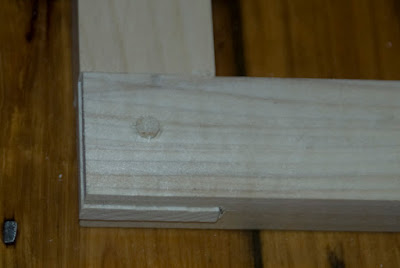
One thing I discovered when cutting wood with the router is there is a tendency for the edge of the wood to splinter if you are making a cut completely across a piece of wood. To prevent this, it is useful to clamp a piece of scrap wood to the trailing edge of the wood being cut. Here are two pictures of this. This first shows a top-view of a piece I was making into a tenon joint, the second shows the bottom of the piece after it was cut.

After several hours of experimentation with the router table, I finally got the desired joint. Once I verified the technique on some scrap wood, I made one window frame as a test case. The corner bridle joints held together pretty well - I made them tight enough to require a mallet to tap them into place.
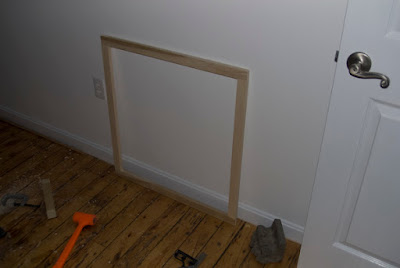
Then, once I had a square frame, I drilled a hole in each corner and tapped in a a small wooden dowel to prevent the joints from separating.
Once the main frame was complete, I cut some small strips of wood for the lattice. I notched the main frame to the depth of the wood strip, and made a half lap joint where the strips of wood overlapped so it would all be flush. I then drilled smaller holes in those strips of wood so I could use smaller dowels to hold the lattice in place on the frame.

Then, once all was together, I glued the rice paper to the back of the frame. Given the rice paper is translucent, I matched the shoji lattice so it overlaps with existing pane layout of the mill windows. This way the underlying mill window frame won't throw any extra shadows on the rice paper. Here's the final product. (You can see the matching mill window lattice in the window on the right.)
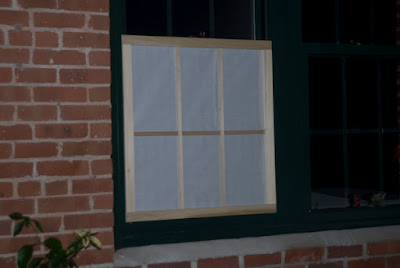
A friend recommended I use double-sided tape for attaching the paper, but I didn't have any on hand, so I resorted to Elmer's glue. The reason for not using glue is if you don't get the paper in the proper place the first try, you then have to slide it into place, and the glue might then end up being visible. Given the size of the rice paper roll I had, it took two sheets of paper to cover the lattice. The first piece went on ok, but I accidentally dragged the second piece across the glue, so in the upper middle pane you can notice a faint line of glue on the paper.
All-in-all, it was a fun project. I'm pretty happy with how it turned out. I intentionally did not apply any finish to the shoji screen wood. In fact, I didn't even sand the joints. Since this was my first attempt, I knew there would be some visible mistakes in the joints and such. I reasoned that the gaps and such in the wood would be even more noticeable or out-of-place if they were sanded smooth and were side-by-side with joints that looked a lot better. By leaving them all "rough-cut" they all match a bit better. At least, that's what I hope.
It took a long time, and I made plenty of mistakes along the way, but I think the next batch of screens will go a bit smoother based on what I learned. I still have five more windows to cover. Hopefully they won't each take as long as this first one.
One thing I'm wondering is whether the shoji screens might look better with the panes subdivided a bit more. As I already mentioned, I intentionally matched the mill window pane design. I suppose as long as I don't move these initial three cross bars, I could add more cross bars to make smaller panes. My one concern would be that it might look odd that the screens don't match the layout of the mill windows above them. Also, from an outside view the mismatched lattice work would be noticeable at night due to lights from within my condo.
Here's a picture of the one I bought. It's a Hitachi 2.25 HP combo fixed base / plunge base. It's a mid-range router - not top of the line, but good enough for my needs.

The first day I had the thing I was a bit overwhelmed. Having never used a router before, it took me a while to get used to the various settings. Fortunately, I had a bit of scrap wood to experiment on. The first lesson I learned was it makes a huge difference which direction you move the router. One direction took splintering chunks out of the wood, the other made nice smooth cuts. I later noticed there's an arrow on the base on the router pointing in the direction you should move the router while making cuts.
My initial purpose for getting the router was to make some Japanese-style shoji screens for the windows in my condo. Currently, I have one room set aside as a dojo for practicing karate, however the room is directly across from a neighboring apartment building. Given the large mill windows in my condo, it doesn't leave much for privacy. Sure, I could have bought curtains or blinds, but I thought it might be fun to try to make Japanese screens for the windows. Also, I though those might fit the theme of the room a bit better.
If you don't know what shoji screens are - think of a wooden frame with a wooden pane or lattice, covered with white rice paper. If you've ever been to a Japanese restaurant, or seen a movie set in Japan, you most-likely have seen these screens before.
So, given that I wanted to make a wooden frame, I had to experiment on how I wanted to join the pieces of wood. Here's a piece of wood that I experimented on to get a feel for making different cuts.

I could have just nailed pieces of wood together with their ends abutting to make a frame, but I wanted to do something a bit better. Ideally, I didn't want to use any nails.
Having never done any type of wood joinery before, I decided to research it a bit. A few google searches later and I found what I was looking for. Before reading up on making joints, my initial idea had been to notch the two pieces of wood so they would overlap and remain the same thickness as the original piece. I later learned that there's a name for that - it's called a half lap joint. While a half lap joint would be fairly easy to cut, I learned there are better joints than that for making a frame.
One of the most common joints is a mortise and tenon joint. With this joint, a square hole is cut in one piece of wood, and the other piece of wood has its end shaped to match this square hole. Then, the shaped piece is just inserted into the square hole. There are bunch of variations on the mortise and tenon joint, one of them is called a corner bridle joint. Instead of cutting a square hole for the mortise, the end of the wood is slotted, and the other piece of wood has its ends trimmed so it will fit in this slot. This is the joint I decided to use. Here's a picture of two pieces of wood I cut to form this joint.


As I already mentioned, I've never used a router before, and never made any joints before (hmmm.. I suppose there's a drug joke there...), so it took me a very long time to get to those above two finished pieces of wood ready to be joined.
Along the way, I discovered people often make things called "jigs" for doing various tasks with routers. They might have one jig for making dado cuts, another for cutting tenons, etc. I don't have a workshop - I'm just using the empty dojo room as a temporary carpentry area - so I don't have a workbench. I don't even have a table in the room. Everything is just scattered around on the floor. Most of the jigs I read about involved clamping the jig to a workbench, so they weren't too practical for me. In fact, most projects I read about involving a router mentioned the importance of clamping the wood to a table so the router could more safely be moved across the surface of the wood. This made me realize it would be a lot easier to do this project if I had some sort of table. But as I mentioned, I don't have a workshop, so it would be impractical to buy a regular work bench or wood working table. Once I was done with this project, I'd need to store the table somewhere.
Another alternative to clamping the wood being worked is to have the router built into a table. Then, rather than moving the router across the wood, you feed the wood across the router, similar to how you use a table saw. The router is just attached upside down to the bottom of the table so the bit sticks up through a hole in the table. Again, I don't have room for a full-sized table, but I discovered one company that makes a portable router table. It's fairly compact in size, and when your are done using it, you can just fold it up and stow it somewhere. So, that's the route I took (ug, that's not an intentional pun). Here's a picture of the table:

The table has a removable adjustable fence. It allows a stable surface for sliding wood across the router and the two knobs on the back provide a means for adjusting the distance from the router blade. The fence is made of two pieces, so you can set there distances independently. So far I've only used this for making the left-hand fence into a stopper to prevent me from sliding a piece of wood too far across the router bit. That allows me to ensure I make a cut of a precise length (very useful for making the tenon joints all the same length. Supposedly this dual adjusting fence is also useful for some other routing technique, although I don't yet understand what that is. (The manual says "it allows jointing without the use of shims.")
One thing I discovered when cutting wood with the router is there is a tendency for the edge of the wood to splinter if you are making a cut completely across a piece of wood. To prevent this, it is useful to clamp a piece of scrap wood to the trailing edge of the wood being cut. Here are two pictures of this. This first shows a top-view of a piece I was making into a tenon joint, the second shows the bottom of the piece after it was cut.


After several hours of experimentation with the router table, I finally got the desired joint. Once I verified the technique on some scrap wood, I made one window frame as a test case. The corner bridle joints held together pretty well - I made them tight enough to require a mallet to tap them into place.

Then, once I had a square frame, I drilled a hole in each corner and tapped in a a small wooden dowel to prevent the joints from separating.

Once the main frame was complete, I cut some small strips of wood for the lattice. I notched the main frame to the depth of the wood strip, and made a half lap joint where the strips of wood overlapped so it would all be flush. I then drilled smaller holes in those strips of wood so I could use smaller dowels to hold the lattice in place on the frame.

Then, once all was together, I glued the rice paper to the back of the frame. Given the rice paper is translucent, I matched the shoji lattice so it overlaps with existing pane layout of the mill windows. This way the underlying mill window frame won't throw any extra shadows on the rice paper. Here's the final product. (You can see the matching mill window lattice in the window on the right.)

A friend recommended I use double-sided tape for attaching the paper, but I didn't have any on hand, so I resorted to Elmer's glue. The reason for not using glue is if you don't get the paper in the proper place the first try, you then have to slide it into place, and the glue might then end up being visible. Given the size of the rice paper roll I had, it took two sheets of paper to cover the lattice. The first piece went on ok, but I accidentally dragged the second piece across the glue, so in the upper middle pane you can notice a faint line of glue on the paper.
All-in-all, it was a fun project. I'm pretty happy with how it turned out. I intentionally did not apply any finish to the shoji screen wood. In fact, I didn't even sand the joints. Since this was my first attempt, I knew there would be some visible mistakes in the joints and such. I reasoned that the gaps and such in the wood would be even more noticeable or out-of-place if they were sanded smooth and were side-by-side with joints that looked a lot better. By leaving them all "rough-cut" they all match a bit better. At least, that's what I hope.
It took a long time, and I made plenty of mistakes along the way, but I think the next batch of screens will go a bit smoother based on what I learned. I still have five more windows to cover. Hopefully they won't each take as long as this first one.
One thing I'm wondering is whether the shoji screens might look better with the panes subdivided a bit more. As I already mentioned, I intentionally matched the mill window pane design. I suppose as long as I don't move these initial three cross bars, I could add more cross bars to make smaller panes. My one concern would be that it might look odd that the screens don't match the layout of the mill windows above them. Also, from an outside view the mismatched lattice work would be noticeable at night due to lights from within my condo.
Monday, November 12, 2007
Quote to think about
"It is everyman’s obligation to put back into the world at least the equivalent of what he has taken out of it."
-Albert Einstein
-Albert Einstein
Monday, November 05, 2007
Miscellaneous pictures
I haven't been taking many photographs lately - just haven't had the time - but I did just discovered a couple pictures on my camera that I took a month or two ago.
This first one is from a trail in the Douglas State Forest. I'm not sure if I like the black and white effect better than the original, but I just couldn't seem to capture the feel correctly with the color version. It was a fairly dark, quiet section of the trail, with tall pines providing overhead cover.

On the same hike, there are a few of these watering hole type things. I'm not sure what their original purpose was 100 or so years ago - maybe the area was all farmland and these things were used for gathering water? Or maybe someone was bored and without the distractions of the Internet they spent their free time digging holes and lining them with rocks. I find it interesting that there are steps built into it. Maybe it was so the person could easily climb out after they finished digging the hole. Heh.. yeah, that's gotta be it.

I
Creepy guest
Every once in a while I'll see one of these things in my condo:

They're pretty fast and creepy and my gut reaction when seeing one is, "Holy smokes! What the heck is that?!??! Ick! Kill it!", but from what I've read, these little critters are actually beneficial. They're called house centipedes and according to those in the know, they've come to the US all the way from Europe. It just wouldn't be kind of me to kill them after they've travelled so far. What kind of welcome would that be? "Hi, welcome to the US. Meet the bottom of my shoe. I hope you like it." No, no, that just wouldn't be right.
They are predators (as are spiders) and they eat all sorts of "bad" bugs. So, I figure, if these things are managing to survive in my condo, there must be a healthy diet of bugs that I just don't see around. As long as they don't start biting me (which supposedly they are capable of doing), I suppose I won't start squashing them, either... even if they are awfully ugly creepy
things.
Sunday, October 14, 2007
Failed again
Well, I tried to donate blood again this morning and failed. First off, it was a bad sign when they tried to sign me up for doing an "R2" donation - which is what I tried two weeks ago. I explained that I was told not to try that again. Initially, the nurse doing the sign-up asked the head nurse of the group for confirmation. She came over and said something like, "What do you mean you've been banned from using the machines? Who told you that?" She was skeptical that I would have been banned - she said something about it usually being the muscular types who have a problem because the muscles push against the veins. (Hey, wait a second! Was that a jab? Hmmm.... so much for me trying to impress people with my muscles.) Anyhow, she took a look and agreed with the previous assessment from two weeks ago. She said the flow of blood out would be fine, but the return didn't look so good.
So, it was back to the original plan of doing a "whole blood" donation. I'm not sure exactly what went wrong (I try to not look at the needle for fear of creeping myself out) but after the inital prick of the needle, the nurse didn't seem too happy and began to adjust tape on my arm holding the return tube, then began adjusting the angle of the needle, and then finally called someone over for help. Best I could glean from the conversation was the needle went in too far initially and as a result the spot was starting to clot and the blood flow wasn't going to be good. Unlike a blood test where they get to try the same arm repeatedly, it appears due to the sized hole made in your arm, they only get one attempt per arm. And since my right arm is virtually impossible for anyone to find a vein, my donation attempt had to end there.
Oh well. I'll have to try again once my arm heals.
Sunday, September 30, 2007
A poor design for blood donation
Apparantly, my arms aren't designed properly for donating blood. Ever since I can remember, people have always had trouble when trying to draw blood from my arms for doctor visits and such. There was one particular case where a nurse tried jabbing me with a needle three or four times before giving up and asking another nurse to give it a try. That paired with my propensity for fainting when having blood drawn has caused me to avoid donating blood.
I know donating blood is for a good cause and saves lives, so a couple months ago when a friend mentioned she was going to donate blood, I decided to try again. The last time I donated blood I was in high school over 20 years ago and I nearly fainted. Surprisingly, this time the whole process went quite well. While the nurse did mention my vein was a bit of a challenge, she had no problem getting the needle in on the first attempt, and I didn't even get light-headed.
So, two months later I became eligible to donate again and I was happy to give it another go today. Unfortunately, it didn't go so well. The nurse suggested that since I have a common blood type (A+) it would be worthwhile for me to do some sort of "double" donation of red blood cells. For this type of donation they hook you up to a machine and take twice the number of red cells than usual, but also attach a return tube to you to put back all your plasma and platelets and also add some saline. The nurse ran a quick test to see if I was eligible for this type of donation and it turned out I was - almost 50% of my blood was made up of red cells. So far so good. But, the problem started when the nurse went to attach me to the machine that would be filtering my blood. From what I've been told, the vein in my right arm is so well hidden it was immediately ruled out for use. The vein in my left arm is slightly better. After a consultation among three different nurses, one nurse didn't feel comfortable enough to attempt it, but the the other two thought it would be doable, just a bit challenging. The nurse was able to get the needle into the vein, but once the machine was turned on to draw my blood at a faster than normal rate, my vein collapsed and the blood flow stopped. The nurse tried to move the needle around a bit to get the blood flowing again, but it would always end up stopping a few seconds later. After about 15 minutes of this, they finally gave up. I had only donated 48ml of blood - not an amount that could be usable. I was told that in the future I should just stick with the normal "whole blood" donation. Since I had lost such a small amount of blood, I was told I could donate again right away. If my right arm actually had a vein they could use I could have done it right then. However they said I'll need to wait until the current vein in my left arm heals before coming back.
Hopefully I'll be back again next week for another donation attempt. It's just a slight discomfort and is definitely worth the minor inconvenience since it helps saves lives. Too bad my body doesn't seem to have a good design for donating blood.
Saturday, September 29, 2007
Learning Japanese
I'm trying to learn Japanese. Since Japanese doesn't use the alphabet for writing, my first task is to learn how to recognize the primary symbols used in Japanese writing. To complicate matters, there are actually three different ways of writing things in Japanese. There are two sets of phonetic symbols - Hiragana and Katakana - and then a very large set of symbols called Kanji, which mostly originated from the Chinese writing system. Unlike English with it's myriad rules of pronunciation and spelling, things written in hiragana and katakana are very easy to sound out. Each symbol represents a unique sound. However, kanji is a different story. Unlike Hiragana and Katakana, Kanji symbols (called characters) represent words rather than phonetics, so if you don't recognize a Kanji character, you have no way of sounding it out to know how to pronounce it. Fortunately, a lot of Japanese text is in the phonetic Hirigana and Katakana, so it's a good place to start.
Hiragana is the set of symbols used for writing normal Japanese words. Katakana is a different set of symbols used for writing words of foreign origin. Since each symbol represents a unique sound, there are quite a few more symbols than there are letters in the alphabet. In fact, there are 46 basic hiragana symbols, along with another 25 minor variations to some of these base symbols. Here's a picture showing the hiragana set:
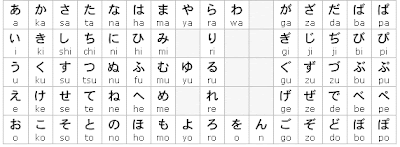
Notice the block of 25 characters on the right are based on other characters in the main group from the left, but with simple additions. So, if you know the base character, it's pretty easy to know what sound the modified form is.
The other interesting thing about this table is it represents all the sounds used in the Japanese language. Every word is made from a combination of these sounds. Notice there are some sounds in the English language that don't exist in Japanese. There are also some sounds in Japanese that aren't very easy for an English speaker to pronounce. For example, try to pronounce tsu. If you've never studied Japanese or Chinese before, it's not likely to be easy to say it correctly.
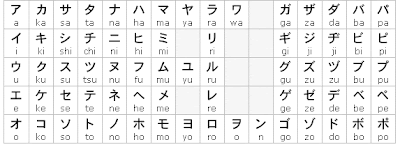
As I already mentioned, there's also a second set of symbols - called katakana - used to write foreign words. This includes the names of non-Japanese people, the names of countries, certain modern inventions (computer), or other items not originally from Japan. Even the phrase coffee milk is written in katakana. (Surprisingly, while coffee milk tends to mainly be found only in the Rhode Island area here in the United States, it's actually a common item (along with coffee soy milk) in Japanese supermarkets. This was a pleasant surprise to this coffee milk fan.) Here's the katakana set:
So, when someone is first learning to read or write Japanese, there's an initial learning curve just to be able to know how to write the sounds of the language. And not only do you have to learn all these symbols once, you have to learn them twice so you can write them as both native language words and foreign words! It's a bit more to memorize than the 26 letters of the alphabet - even if you count both upper and lower case letters. And I won't even talk about then trying to learn the thousands of kanji characters used in every-day Japanese.
Given this large set of symbols to learn, I was looking for helpful tools to aid in learning them. I came across a pretty handy web site that lets you practice learning groups of characters. It can be found here: www.realkana.com. While the tool is quite simple, I found it very useful. It lets you check off different blocks of characters to learn and then it randomly presents them in flash-card form. I have found it easiest to work with learning blocks of 5 characters at a time. Then once I know those 5 fairly well, I'll go back and practice with the previous few blocks and this latest block. Then, once I'm comfortable distinguishing those characters, I'll do some practice sessions with all the ones I've learned so far mixed together. Working this way, I find I can get pretty comfortable with 15 or 20 new characters in an hour or so. But, after that hour of practicing I find I really need to give my mind a break.
Hiragana is the set of symbols used for writing normal Japanese words. Katakana is a different set of symbols used for writing words of foreign origin. Since each symbol represents a unique sound, there are quite a few more symbols than there are letters in the alphabet. In fact, there are 46 basic hiragana symbols, along with another 25 minor variations to some of these base symbols. Here's a picture showing the hiragana set:

Notice the block of 25 characters on the right are based on other characters in the main group from the left, but with simple additions. So, if you know the base character, it's pretty easy to know what sound the modified form is.
The other interesting thing about this table is it represents all the sounds used in the Japanese language. Every word is made from a combination of these sounds. Notice there are some sounds in the English language that don't exist in Japanese. There are also some sounds in Japanese that aren't very easy for an English speaker to pronounce. For example, try to pronounce tsu. If you've never studied Japanese or Chinese before, it's not likely to be easy to say it correctly.
As I already mentioned, there's also a second set of symbols - called katakana - used to write foreign words. This includes the names of non-Japanese people, the names of countries, certain modern inventions (computer), or other items not originally from Japan. Even the phrase coffee milk is written in katakana. (Surprisingly, while coffee milk tends to mainly be found only in the Rhode Island area here in the United States, it's actually a common item (along with coffee soy milk) in Japanese supermarkets. This was a pleasant surprise to this coffee milk fan.) Here's the katakana set:

So, when someone is first learning to read or write Japanese, there's an initial learning curve just to be able to know how to write the sounds of the language. And not only do you have to learn all these symbols once, you have to learn them twice so you can write them as both native language words and foreign words! It's a bit more to memorize than the 26 letters of the alphabet - even if you count both upper and lower case letters. And I won't even talk about then trying to learn the thousands of kanji characters used in every-day Japanese.
Given this large set of symbols to learn, I was looking for helpful tools to aid in learning them. I came across a pretty handy web site that lets you practice learning groups of characters. It can be found here: www.realkana.com. While the tool is quite simple, I found it very useful. It lets you check off different blocks of characters to learn and then it randomly presents them in flash-card form. I have found it easiest to work with learning blocks of 5 characters at a time. Then once I know those 5 fairly well, I'll go back and practice with the previous few blocks and this latest block. Then, once I'm comfortable distinguishing those characters, I'll do some practice sessions with all the ones I've learned so far mixed together. Working this way, I find I can get pretty comfortable with 15 or 20 new characters in an hour or so. But, after that hour of practicing I find I really need to give my mind a break.
Subscribe to:
Posts (Atom)